When you are planning to create Dropbox upload forms for your WordPress site, often a question arises regarding shortage of storage.
For a job portal or an interactive WordPress site that requires users to upload forms, files, or contents, Dropbox can be the smoothest option for all the storage.
Dropbox provides an amazing service for sharing and uploading files and poses as your secondary storage location. It is relatively cheaper to maintain all the media libraries and folders via Dropbox.
So, this article will show you how it’s easier to manage storage using Dropbox. But prior to that, you need to know about upload forms to create Dropbox Upload Forms in WordPress.
Table of Contents
What are the upload forms?
Forms denote a simple and convenient method to gather information from the users who have visited the websites. The upload form on the other hand, provides an additional advantage to include more specific and important information regarding the visitors.
These upload forms are extremely useful for the job portals when you have to submit your CV or resume via the website. So, in most of the cases, the upload forms help a visitor to provide the following sets of data through these forms:
- files including the resumes
- images or videos provided by the users
- blog posts contents
How will you create upload forms in WordPress and integrate it to Dropbox?
Understanding the way upload forms are created is important before integrating them with Dropbox.
I. Using Contact Form 7 to create upload forms and then integrating to Dropbox
You can choose a plug-in like Contact Form 7 from the official directory of plugins of WordPress for creating Dropbox Upload Form in WordPress. Post this, follow these steps:
1. From Contacts go to “Add New” from the dashboard of WordPress.
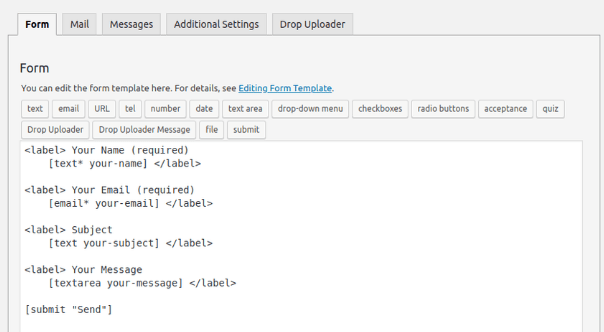
2. Contact Form 7 provides a readily available template for forms.
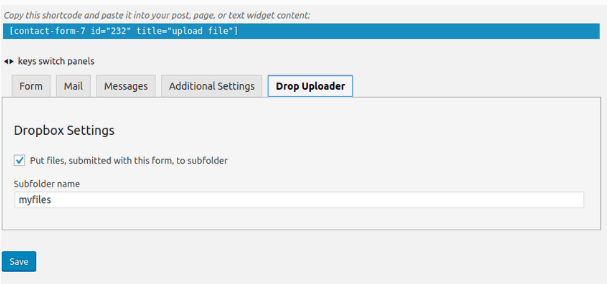
3. After this, hit the “Drop Uploader” that will show a popup as this:
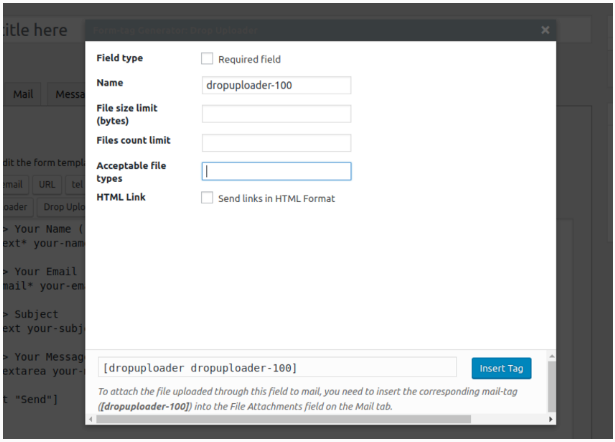
4. Fill up the fields as required, “Files Count Limit” and “Accepted File types.”
5. Click the Insert Tag to apply the changes to your form.
6. Add a message, by clicking the tab, Drop Uploader Message.
7. Form template also has fields of checkboxes, radio buttons, or dates which you are free to use.
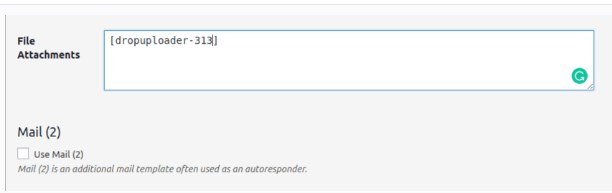
8. In the Mail tab, add the shortcode for the uploader.
9. If you want to receive files with mails, then paste the shortcode in File Attachments.
10. Finally, embed the upload forms to WordPress by clicking on Add shortcode. Just paste the contact form shortcode here.
Integrate with DropBox
Here are the steps that you should follow to integrate Dropbox Upload Form in WordPress:
1. Go to Dropbox Developers and login to your account on Dropbox.
2. Clicking on “create apps,” select Dropbox API and then choose access types for your API.
3. Click on button labeled, “Create app” which will redirect you to the app information page.
4. Scroll down to OAuth 2 and click the button, Generate token.
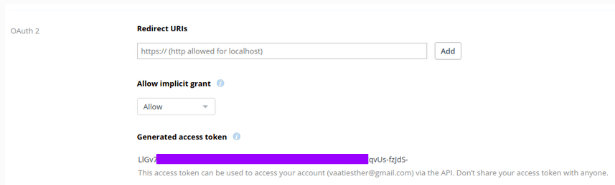
5. Copy and paste token to Dropbox token on your WordPress site.
6. Edit receive file section by heading to the tab, Drop Uploader and then activate settings.
7. Save from settings to receive file links from Dropbox. For confirming file submissions to Dropbox, just go to Apps from Dropbox account.
What are the ways to integrate upload forms to Dropbox?
1. Use Ninja Forms
With the use of Ninja Forms, you don’t have to create the Dropbox Upload Form in WordPress before you integrate it with Dropbox. The add-ons of file uploads will help to create Dropbox upload from Ninja forms.
Follow these steps to directly upload files to Dropbox:
Use file uploads in settings to connect Dropbox
1. The WordPress Dashboard has a “File Upload” option.
2. Go to Ninja Forms and then to “File Uploads” and click the tab, “External Settings.”
3. Find the Dropbox settings and then hit on “Connect.”
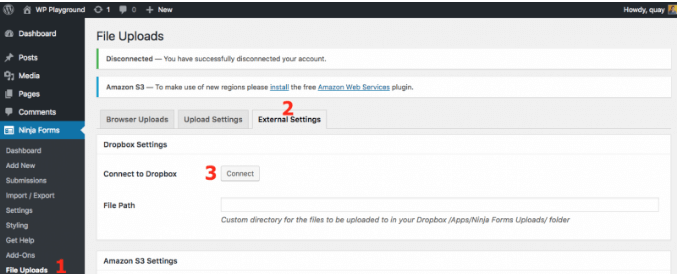
4. A prompt message will appear and you have to confirm Dropbox.
5. When you are connecting file Path with “Connect to Dropbox,” path of the file Apps/Ninja Forms will be immediately formed.
6. To define your subdirectory, the file path is important.
Select the forms for Dropbox
1. Create an upload form or select one which has the option for “File Upload.”
2. This will upload and store the file in the usual media libraries.
3. To redirect this upload form to Dropbox, add the action, “External File Upload” to the form. The “Email & actions” Tab has this option.
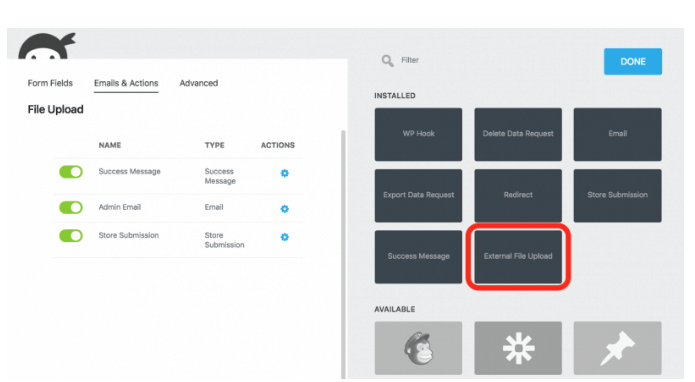
4. Click on the form to find a number of options for configuration. You have to swipe the button towards the right to turn it green to allow File Uploads on Dropbox.
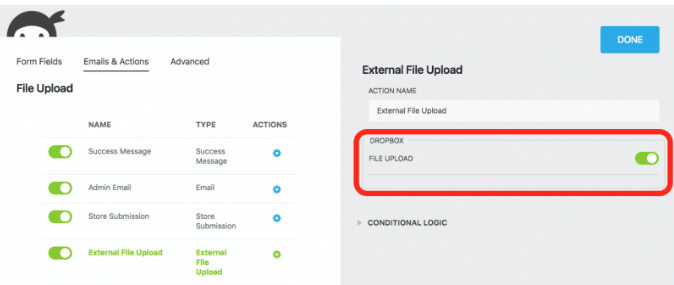
5. This way, the files that your visitors upload will only hit the media library while being uploaded to Dropbox.
Other Dropbox plugins for integrating WordPress forms:
In order to create Dropbox Upload Form in WordPress, you can use these plugins:
Gravity Forms Dropbox Uploader
This is a popular plug-in for uploading your files to the Dropbox account through your WordPress sites. It is a free add-on plugin and you have to authenticate with Dropbox account providing its key.
Post via Dropbox


Post via Dropbox is such a plug-in that allows you to upload text files and the plug-in fetches the files from your Dropbox account. It supports markdown formatting within text files and uses file names for titles.
Simple Dropbox Upload

These simple plug-in allows you to directly upload files to your Dropbox account. You have to install this plug-in and authorize the Dropbox account with it. Customize the upload forms and messages that appear after the successful uploading of files.
File management involves a lot of hassles, but with Dropbox, you can automate the process with ease. This article will help you seek some of the easy ways to develop Dropbox Upload Form in WordPress so that you can automatically transfer the files to storage.
A plus, you won’t have to manually go through all the files to find which are irrelevant to delete them and save space.