If you are running a website on WordPress, chances are your regular visitors will need the invoices to download. This so happens when they are purchasing a specific goodie from landing pages of your website.
So to say, the importance of digital downloads of customer invoices increases for the ease of use, comfort, and veracity of the transactional data on your website.
Table of Contents
Reasons For Wanting To Create Digital Download Invoices:
Authenticity of the transaction
Buyer will trust you more when they can download the invoice on the spot and verify their purchases.
Reduced cost of logistics
You wouldn’t have to go out of the way to maintain an invoice a buyer. The machine will automatically calculate the purchase and generate the invoice immediately.
Faster check-outs for large orders
When a buyer knows there is an option to generate an invoice with every purchase, he can easily place orders for a large amount of stock under the same bill without demanding a separate one extensively.
Now, let’s get acquainted with the top things to do for enabling these invoices and start increasing your website’s authority in real as well:
1. Find the Easy Digital Downloads plugin on your WordPress account
This step is the foremost one to begin digitising your invoices and enabling the customers to avail them without fail even at once.
If you are a regular WordPress account holder, you will know that you can easily find the updated plugins in the Plugin section on the Dashboard panel of your admin account.
So, without delay, you can find it and begin installing the Easy Digital Downloads. It might take a few minutes, which depends upon your internet speed at the moment.
Also, note that this plugin has multiple features apart from invoicing, which you can avail later on. Moreover, some features in this plugin are premium. So, if you will wish to continue using this plugin for digital downloads of customer invoices, at some point in time, you will have to purchase it.
So, once you click “Add New” option under the Plugin section, find this plugin using the search engine and then click “Install” before clicking “Activate” beneath the same plugin.
This is actually the standard procedure of installing any plugin on WordPress. And chances are you are already familiar with this step, if you have used another plugin on your WordPress website earlier.
2. Set Up The Invoicing Page
After the successful installation of the add-on to your WordPress account, the next step talking about installing the page that will consist of the invoices to be generated.
However, you must notice when you activate this application on your WordPress business account, there will be multiple pages that are automatically created.
But out of these pages, you wouldn’t find anyone belonging to the Invoice section. And that is why you need to set it up separately.
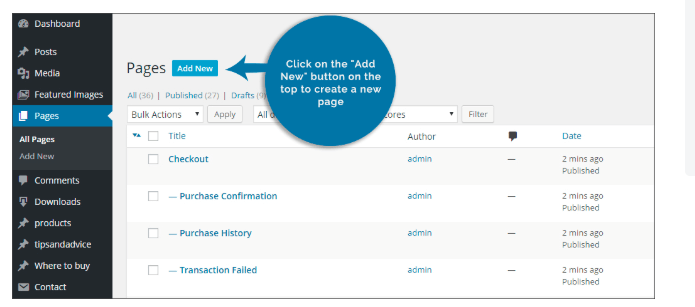
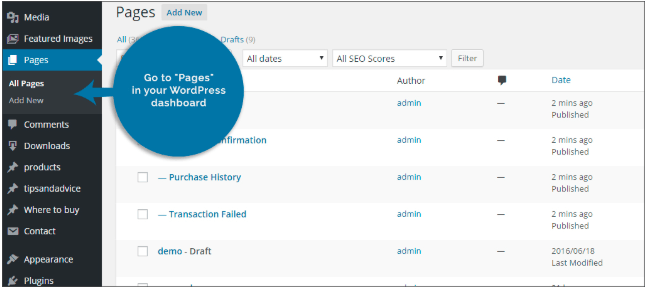
For that, again, go to the Dashboard and find Pages section this time. When you click this section, a drop-down menu will open consisting All Pages and Add New.
From these options, you are entitled to click “Add New.”
Or else, you simply open the Pages section and on the right-hand side of the screen, you will find a blue button “Add New” next to the Pages title.
Sincerely, you should click either of the button to begin the processes of setting up your WordPress Website’s invoice page for digital downloads of customer invoices to be enabled with ease.
3. Begin Editing The Invoice Page
After you have opened the new page for invoicing, you need to begin editing it, so that it is suitable for all the billing needs of the customer visiting and purchasing from your website.
Firstly, you must add a name to this page. You can simply write “Invoice” for this page for obvious reasons.
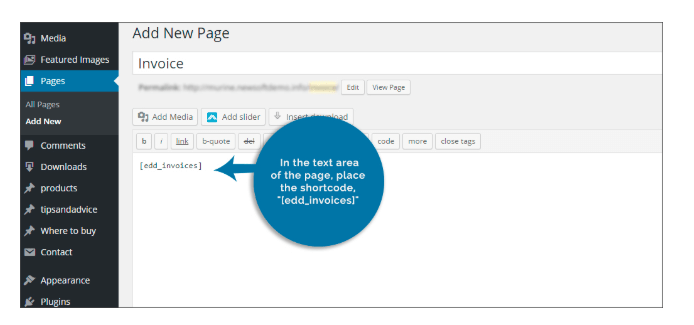
Moving on, you will see a wide space on this editor, as shown in the image above. Here, you need to write a short code:
“[edd_invoices]”
The same reference has been made pretty in the snapshot posted above.
Furthermore, to try the premium features of this plugin, you need to follow other steps, because the free features are very limited for the digital downloads of customer invoices:
1. Find The Link Under The Downloads Section
Whenever you are installing and activating the Easy Digital Downloads plugin, it will render your Dashboard with another section called Downloads.
After clicking it, you need to find the same plugin on the right-hand screen and click the link that says “Extensions”.
2. Get The Extensions Related To Invoices
Next, a list will be opened that will frame other extensions to work together with this plugin. This will help you in making the Invoice page more user-friendly.
One such extension is “PDF Invoices”, which you can get by clicking the option of “Get This Extension” next to it. This click will take you to the purchase page of the extension.
As mentioned earlier, many extensions in this plugin are premium, it means you will have to buy them better usability.
3. Embed The Extension Onto Your WordPress
Once you buy this add-on to be used inside the original plugin, you will receive a zip folder to download. You need to install it and then move on to the next step by adding it onto your WordPress account that handles your website.
4. Begin To Control The Invoice Page
Now, this extension will allow you to edit the invoice page further as the premium feature of this Plugin for successful digital downloads of customer invoice and to increase the actual traffic which has sure-shot intention to buy from your website.
Under this step, you are expected to go back to the Downloads option in your WordPress account Dashboard. Here, under the plugin and against the extension you have downloaded, you will find additional setting option.
Here you will find the drop-down menu to select the invoice page you had created earlier. When you click it, you can then begin manipulating the same page for the better user experience and interface.
5. Add The Information For A Crisp Invoice
Followed by the previous step, you will now get the space to add real and appropriate information about your company. You can also paste the logo of your brand or firm.
This kind of information will automatically then be written whenever the customer demand or seek the invoice page for downloading the invoice for every single purchase or order he or she makes on your WordPress website.
But you need to make sure that you have saved all changes while you are on this editing page to fill-up all the required information that is being asked.
The more information you will, the better it will be for the customer to trust your brand again for similar purchases in the future.